Tuesday, December 2, 2014

The Rabbit Hole

Are you getting sick of the toy room yet?
Well, if you are, there is good news for you. It is pretty much completed. Not that I won't probably add things in the future...because I most likely will.
That is how I roll.
But, just to get you up to speed...
I bought this "couch" to use in the toy room. It sits low to the ground so I thought it would be good for kids. Problem? Where do I begin. It didn't have a cushion or a cover. I figured it wouldn't be that bad to make one myself. That is the problem with wanting to do something yourself....sometimes it doesn't work out quite how you planned. I figured that I would go to the fabric store, buy some foam, make a cover and we would be set.
Do you have any idea how expensive foam is?! Spendy stuff.
So I did what any normal person would do, and I deconstructed our couch and used the foam.
Ok, so most people don't do that. But I did, and it saved me a fortune.
Then I got to problem number two: No cover.
Thankfully, I am handy with a sewing machine so I wasn't quite so nervous about this part. I was mostly concerned about how expensive the fabric was going to be.
Hancock Fabric here has fairly inexpensive upholstery material so I found some there. I then made a pattern out of paper so that I could get the curve of the couch correct.
It took me about a day to complete the cover. I was pretty happy when it was done, but wished I had made the zipper opening a little larger. Trying to get that cushion in ended up being more hassle then I would have preferred.
Since the back of the couch is wood spindles I opted to make some over sized pillows with some fabric that I found at an estate sale.
I also finished up my hand stitched flower pillow, complete with pom pom fringe. I just couldn't help myself.
I have to tell you a secret. I am having a small love affair with Mid Century Modern furniture. I want to buy it all and fill our house.
But I will tell you something else,...it ain't cheap.
I really wanted a cabinet to put in the kid toy room so that I could put the kids legos in drawers and something to hold the kids books. I had been looking at estate sales and the DI but I hadn't had any luck.
I had this cabinet that I had painted with chalkboard paint, but I didn't really love it.
I actually hardly liked it, but it worked.
It is hard to argue with something that serves a purpose, when you don't have anything to replace it with.
Sometimes patience pays off. 
And sometimes it pays off in the form of a $25 dollar dresser.
Funny side story: We bought the dresser for $25 from an estate sale. I couldn't have been more pleased. It came with a mirror that matched it. Because the dresser is right underneath a window I had no purpose for the mirror...so I sold it...for $30. Then, because I had no use for the black cupboard, I sold that for $20. I am going to call this dresser a win.
Especially since this is the same dresser! Crazy!!
With the new dresser, the couch got repositioned to a different wall. I much prefer it to the older set up.
Blake put up some baseboards right before company came for Thanksgiving. It is impressive how much nicer a room looks with baseboards.

Ya'll ready for this?


Finished!
...well...for now anyways...

Wednesday, November 12, 2014

Wonderland

Hey! Long time.
Things have been happening on the home front I just haven't had a lot of time to sit down and write about it. Which...is kind of nice...for you. After all, now you get to see a month worth of work in one medium sized post.
October is always a crazy month for me. I normally am swamped with making masks, Laney's birthday, and trying to complete our own family costumes.
Now that October is over I feel like I can take a little rest, but only for a moment because family is coming into town for Thanksgiving and I would love to have some things checked off my to do list.
When I last blogged the toy room was getting a paint job.
I hadn't liked the color that I had originally purchased so I opted for a more bright saturated color. It was just what it needed. 
After painting the stripes, for what felt like the 90th time, I removed the tape.
I prefer them this color much more.
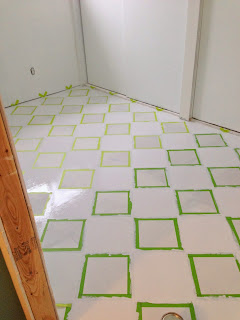
I then got to work on finishing the mushroom bottoms, priming the floor, and started taping off the pattern for the floor.
Painting a checkerboard on the floor seems to be second nature to me now. Blake was in charge of measuring out the spaces and I took care of the rest.
I used an oil based paint which I seem to like the most for painting floors. I didn't do a ton of prep work this time around. We knew that the floor is only a temporary fix until we carpet the room so we didn't want it to be too overly involved. There are cracks and divots in the floor that we just left there. I figured, if anything, it would just add character.
I painted the mushroom bottoms black, and added some grass for good measure. I left all of them stopping a few inches off the floor to account for baseboards.
When the white floor paint had dried, I pulled up all the tape then reapplied the tape so that I could start on the black squares.
When it had dried, I pulled off all the tape and Viola!
I knew we wanted a couch of some sort in the toy room. Ideally, It would have been a hide-a-bed, but I couldn't find one that I wouldn't mind if the kids trashed.
I ended up finding this couch frame on a local Facebook site.
I figured that I could make a new cushion for it, no problem. Problem? Foam for cushions is super expensive. So, I did what any normal person would do...I deconstructed our old couch in order to steal the cushions off of it. Now, I just need to make a cover for the cushions.
Surprisingly, with all the furniture that we had hoped to put in the room, and the walls and floor painted, it still felt a little empty (or undone, I can't decide which is a better description).
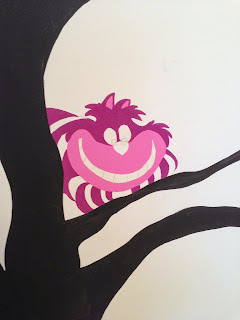
So...I figured that a tree would work to fill the space without taking up any floor space. I started by roughly drawing a tree on the wall closest to the door.
Then I used some black paint and a brush and got to work.
With most of the toy room done, I was anxious to get the kids toys back in the toy room and regain some semblance of cleanliness. I made a trip to Walmart and picked out some buckets so that I could sort the kids toys making it easier for them to find things but also easier for them to clean up. I jokingly told Blake that I wasn't sure if my stack of buckets was enough.
Surprisingly I was actually right on. I had exactly enough buckets, and not one extra.
I will go ahead and say this: Sorting kids toys sucks. You know that it will look so good when you are done, which makes it worth it. Then the kids come in, see that the buckets are all organized and they think that the only logical thing to do would be to pull out every single bucket and play with one toy out of each. Hence the "sucky" part.
Alas, with the toys put away and the furniture put into the room it was starting to come together. I found this cabinet at the DI for a few bucks so I painted it with chalkboard paint, thinking it would be the perfect little book cupboard. As soon as it was in the room and the books were put inside, I realized that the doors opened....it just took a lot of strength to do it. So, of course, I immediately started plotting how I could get rid of the book case and what I could replace it with. (More on that at another time.)
To make the room feel a little more cozy we added some fun touches:
These vintage chalkware birds are the bees knees. I love them so.
Blake, was able to put a door on.
While I don't have a picture of the door...it looks like this:
I love our new doors and can't wait till we can replace all the doors upstairs.
I found this rug for pretty inexpensive at Home Goods. The plushiness of it is great for the concrete floor. The plushiness of it is not great, because it hides legos in it, very easily. Just ask Blake who knelt on a Lego hidden in the carpet.
At an estate sale one weekend I picked up this Mid Century modern cabinet. It replaced the couple of suitcases that I was going to use to hold the dress up clothes.
The room also got some additional art work on the walls. The Cheshire cat was added for...well...for fun.
And, I also added a saying above the closet doors. I used a Sharpie Paint marker (which is cool by the way) and started writing out the words free hand. My problem is, I don't ever like how my writing looks. I know that having something drawn by hand makes for a more whimsical look, but I just couldn't handle it.
I painted over what I had written and then started again. I used a template for the letters and then painted over the top using the Sharpie Paint marker. I much prefer the letters looking like they are all the same.
I have since added a few more things to the toy room but that will have to be for another post, which will come sooner rather then later. 


Wednesday, September 24, 2014

I'm Walking On Sunshine!

When they were working on the walls we decided to start laying our floor.
We had previously decided to do a bamboo flooring that would coordinate with our upstairs hardwood floors. Originally we were going to leave the family room carpet and just put wood flooring at the bottom of the stairs and into the new piano room. When we found some flooring that we liked, we just decided to do it all. Go for the gold...right?! Truthfully, what was the breaking point was we found some flooring at Lumber Liquidators and it was being done away with. The chance of never being able to find the wood, if we changed our mind, was what did it.
We moved all of the furniture and toys and crap to one side of the room and started taking up the carpet and baseboards.
Underneath our carpet was...Surprise...peel and stick tile.
I probably shouldn't have been shocked, but I was, a little. On top of the peel and stick tile they had put some sort of glue to hold the carpet pad down. Only problem was, I couldn't clean the glue off, I tried, and the glue was still sticky. Tacky sticky. It was pretty gross. Instead of taking up the tile, which would have taken a good long while, we decided to lay the wood over the top of the tile.
We ordered some underlayment for the floor when we ordered the wood. It is supposed to help with sound and water.
We used some spacers and started laying the floor.
It wasn't necessarily quick work, but it wasn't horrible either. When Blake and I were working together we were definitely faster then me doing it on my own.
We worked in sections pulling up the carpet, pad, tack strips, and baseboards so that we wouldn't have too much tile exposed since it was sticky
and we were still having to "live" in the area.
Cutting around all the little nooks and crannies was the most time consuming.
When half of the room was done we moved the furniture over and started working on the other half of the room.
The wood extends all the way into the new piano room.
By the end, we just wanted it to be done so we worked really hard one weekend to finish it.
With the wood floors in and the walls painted it finally looked like a room.
By removing the carpet in the family room, it occurred to Blake and I that we no longer had any carpet in our house.
Eventually, we plan on carpeting the two back rooms but for now we are quite happy to have the nasty carpet out of the house.
It is amazing the difference it has made!
Before:
After:
Before:
After:
And just to really rock your world...
Really Before:
and After:
Really Before:
and After: